Finding the appendix on ultrasound is one of the most frustrating experiences for beginners.
You press the probe, you see bowel gas everywhere, and no matter how hard you try, you simply cannot find it.
You are not alone. Even experienced sonographers struggle with this.
If you are facing this problem right now, this tutorial is for you.
To master the art of finding of Appendicitis on ultrasound, what you need is a systematic approach and pattern recognition skill.
Once you understand where to look, what to look for, and how to tell normal from abnormal, everything clicks.
After reading this article, you will
- Understand the sonographic anatomy and the key landmarks that lead you to the appendix
- Use a systematic, step-by-step scanning approach to find the appendix every time
- Measure the appendix correctly using standard technique
- Identify ultrasound features of a normal appendix
- Recognize uncomplicated and complicated appendicitis on ultrasound
- Write a correct, structured ultrasound report
- Avoid the most common pearls and pitfalls
Ultrasound is highly accurate in the diagnosis of appendicitis ( accuracy is less than CT). However, it depends on how trained and expert the operator is.
The goal of this tutorial is to give techniques and tips to diagnose the appendicitis on Ultrasound.
First, we’ll start with clinical clue.
Clinical Clues for Appendicitis
Before you pick up the probe, understand these clinical clues. This tell you what you are looking for and where.
Risk factors
- Appendicitis is more common in males.
- It can occur at any age, but the peak incidence is around 20 years old.
- The overall lifetime risk is 8.6% for males and 6.7% for females.
- It is rare in infants under 2 years old, because in that age group the appendix is funnel-shaped (Wide Lumen) and less prone to obstruction.
Signs and Symptoms
- Right lower quadrant pain or tenderness. (Classical)
- Migrating Pain: The pain often starts near the umbilical region first, then migrates toward the right iliac fossa as the inflammation progresses.
- Nausea and low-grade fever
- On examination you may find rebound tenderness and right lower quadrant guarding.
Laboratory Findings
White blood cell count and CRP (C-reactive protein) are your most valuable lab markers.
White blood cell count (WBC): It rises rapidly within a few hours of onset but can return to normal after 12 to 24 hours if testing is delayed.
C-reactive protein (CRP): CRP stays normal during the first 6 to 12 hours, then rises in proportion to the degree of inflammation.
Here is an important rule: if a patient has had symptoms for more than 24 hours and the CRP is still normal, the chance of appendicitis is low.
In 30% of patients, the signs, symptoms, and laboratory findings are atypical. A normal WBC or CRP does not rule out appendicitis. This is exactly where clinical scoring systems is needed.
Clinical Scoring Systems
Before scoring systems existed, diagnosing appendicitis relied entirely on subjective clinical intuition.
This created two major problems:
- First, surgeons frequently removed perfectly healthy appendixes. (High negative appendectomy rate)
- Second, hesitation to operate caused dangerous delays, leading to appendiceal perforation, abscesses, or life-threatening peritonitis.
Scoring systems were created to fix this. They standardize the diagnostic process, safely rule out low-risk patients, and identify high-risk patients who need immediate surgery based on clinical presentation, physical examination, and laboratory findings.
The Alvarado Score
The Alvarado Score is the most commonly used scoring system worldwide. It evaluates eight criteria for a maximum total score of 10. You can easily remember these criteria with the mnemonic MANTRELS.

Other scoring systems: Pediatric Appendicitis Score (PAS), which is tailored specifically for children; the Appendicitis Inflammatory Response (AIR) Score; and the RIPASA Score, which is commonly used in Asian populations.
With these clinical clue, you now suspect Acute Appendicitis. To prove it, you now need visualize appendix on ultrasound. Let’s talk about how to do that.
Sonographic Anatomy and Important Landmarks
Before you scan, you need to understand what the appendix looks like on ultrasound and what are the important landmark around it.
This is the key to finding the appendix. If you know what you are looking for and where to look, scanning becomes far less frustrating.
How the Appendix Appears on Ultrasound (Sonographic Anatomy)
Long Axis View:
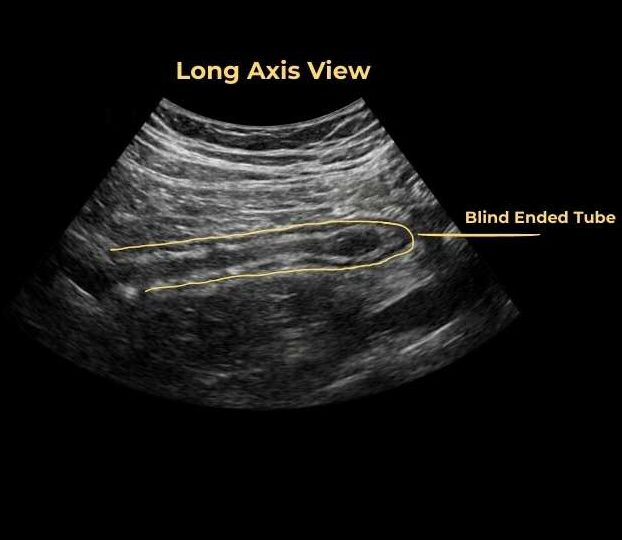
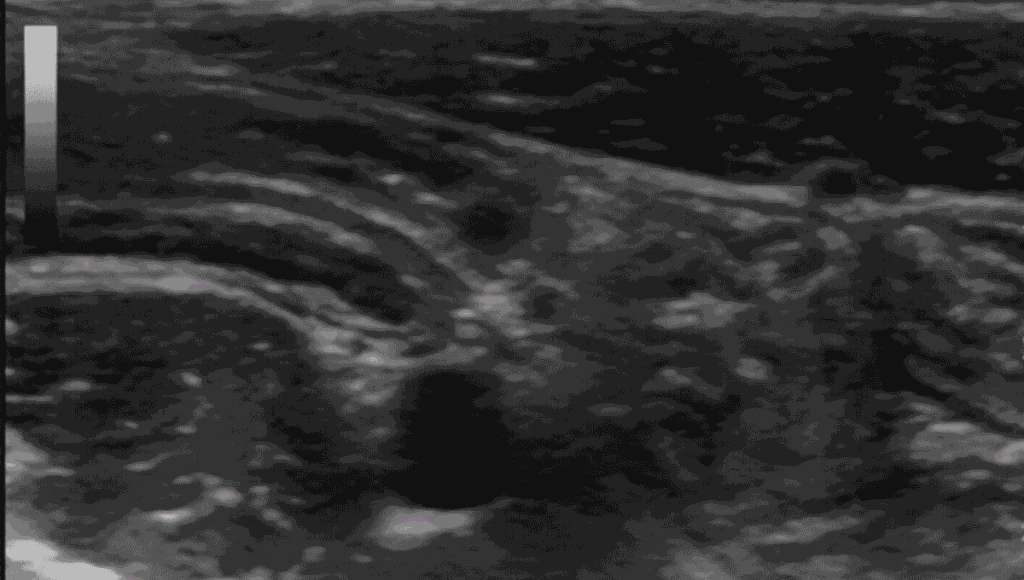
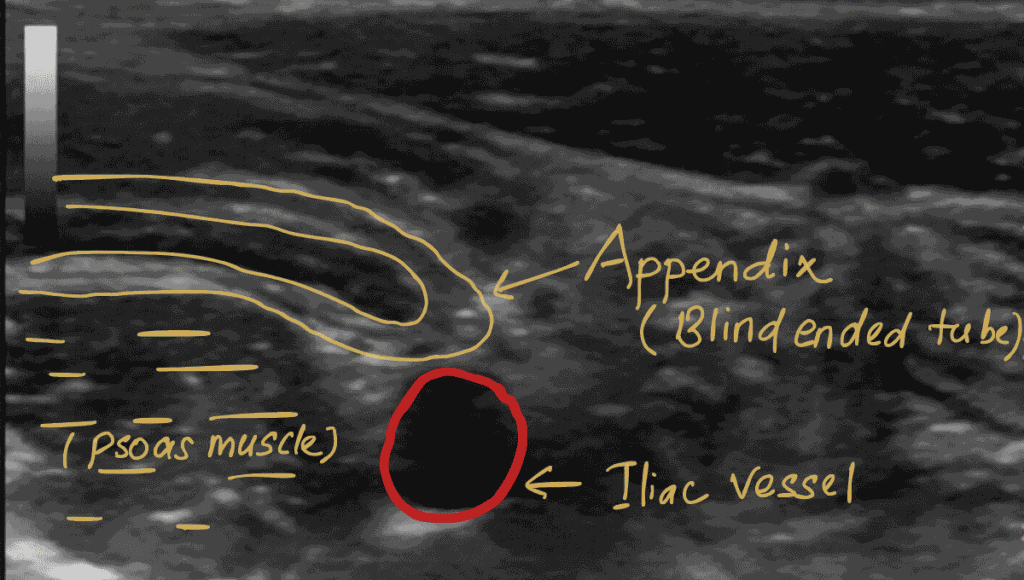
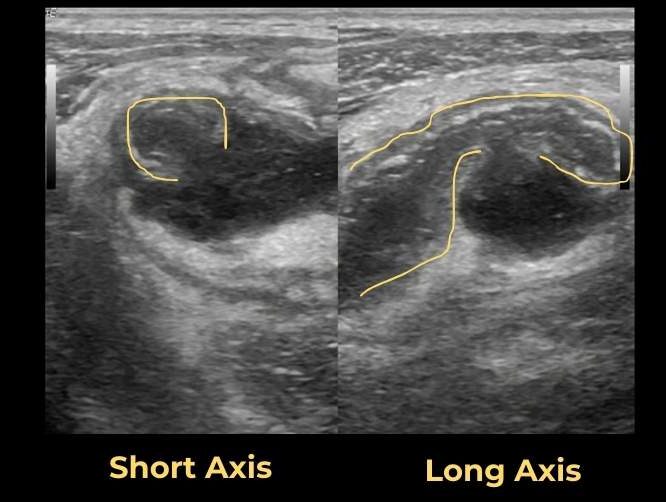
In the long axis, the appendix appears as a blind-ended tubular structure arising from the base of the cecum. You will see the gut signature — the alternating layers of the bowel wall. The lumen inside appears anechoic filled with fluid. You may also see air within the lumen, which is completely normal and actually helps you identify it.
Short Axis View (The Target Sign):
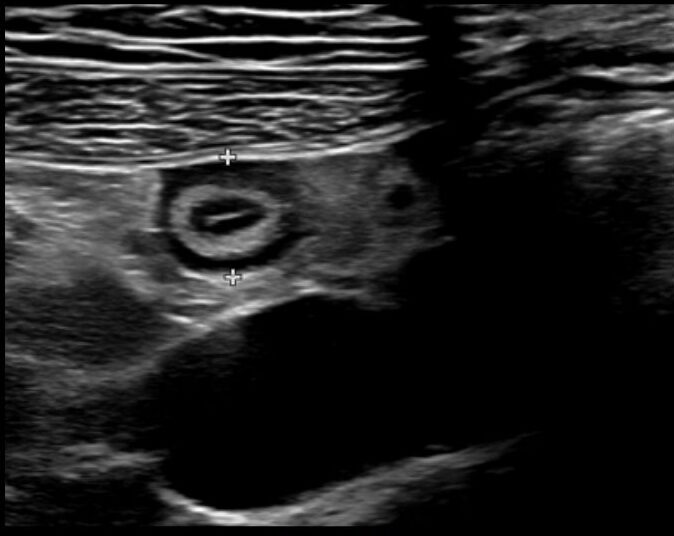
In the short axis, the appendix appears as a target or bull’s eye. This happens because the different gut wall layers have different echogenicity — some are hypoechoic (dark) and some are hyperechoic (bright). This alternating pattern creates the classic target appearance. When you see this, you are almost certainly looking at the appendix.
The Wall Layers of the Appendix (5 Layers vs 3 Layers)
Understanding the layers matters for three practical reasons:
- correct measurement technique
- dentifying gangrenous appendicitis,
- and identifying perforation.
Here is what you need to know.
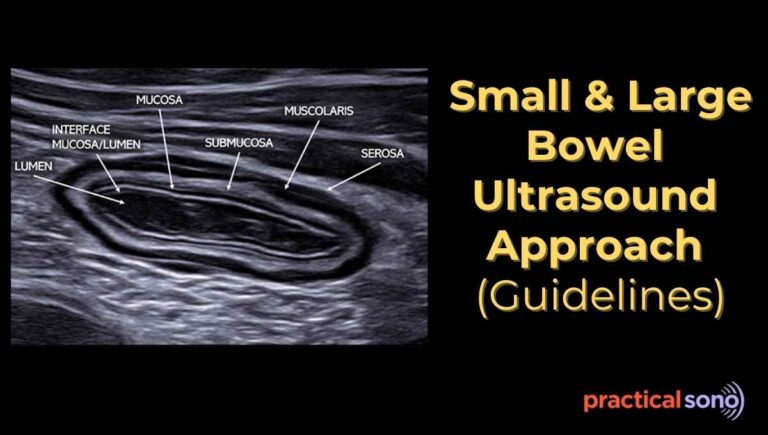
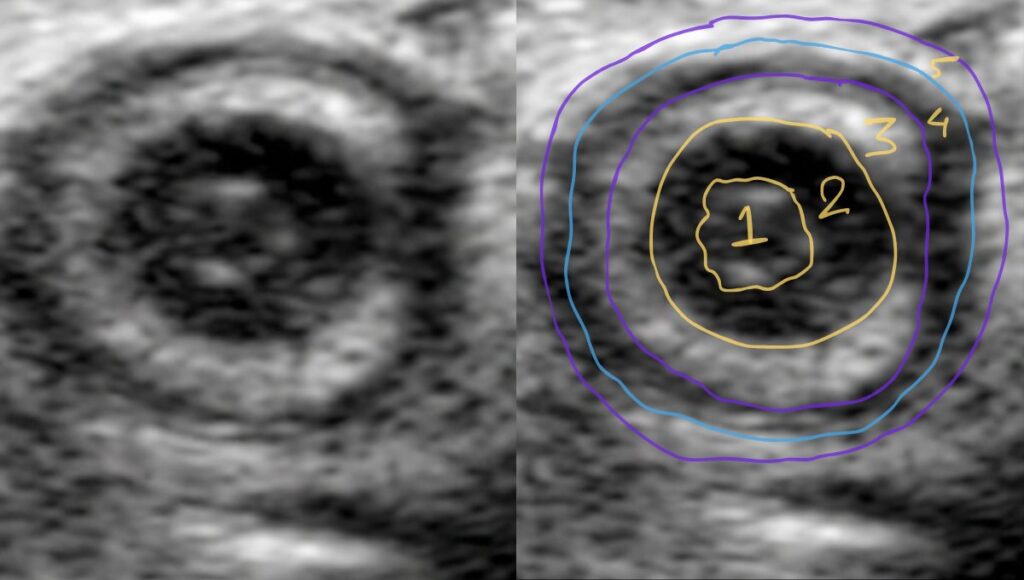
Five-Layer Anatomy
Anatomically, the appendix wall has five distinct tissue layers. You can see all five with a m odern high-end machine using a high-frequency linear probe. (Not seen in low-end machine)
From inside to outside, they are:
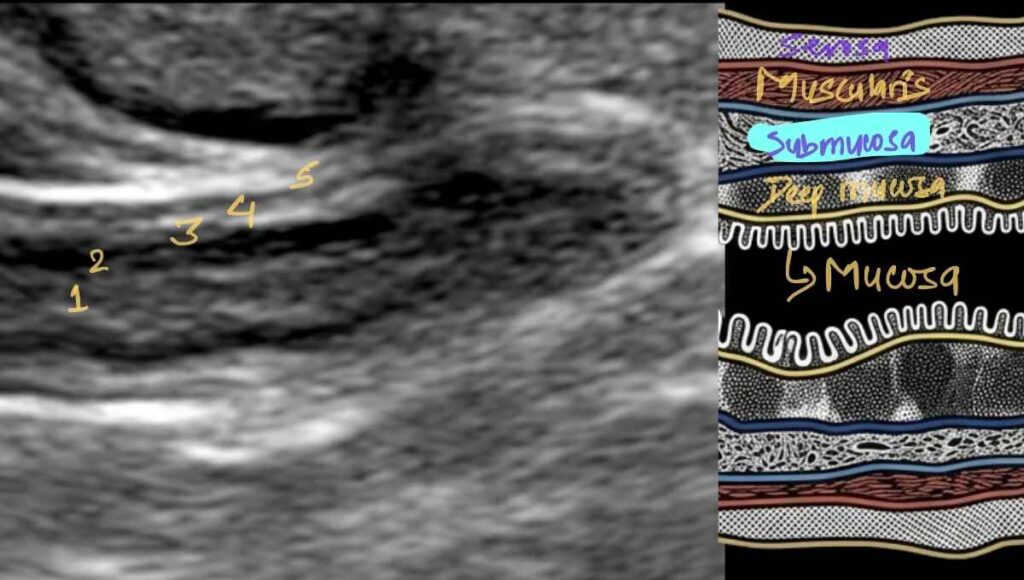
Layer 1 — Superficial Mucosa / Collapsed Lumen Echogenic (Bright)
The innermost surface. In a normal appendix this appears as a bright slit-like line at the center, where the mucosal surfaces touch each other.
Layer 2 — Deep Mucosa /Muscularis Mucosae Hypoechoic (Dark)
A thin layer of connective tissue and smooth muscle supporting the mucosa. In children, it looks more prominent due to high concentration of lymphoid tissue.
Layer 3 — Submucosa Echogenic (Bright)
This is thickest and most identifiable layer of appendix wall. It is rich in blood vessels, nerves, and collagen fibers (this make it echogenic). When this layer disappears, you should think of gangrenous appendicitis. Or, when you see the break in its continuity think of perforation.
Layer 4 — Muscularis Propria Hypoechoic (Dark)
This is main thick muscle layers. In inflammation, this layer swells with fluid, making it thicker and darker.
Layer 5 — Serosa Echogenic (Bright)
The thin outer protective lining connecting the appendix. It is made up of collagen, elasting and fat, which makes it appears bright.
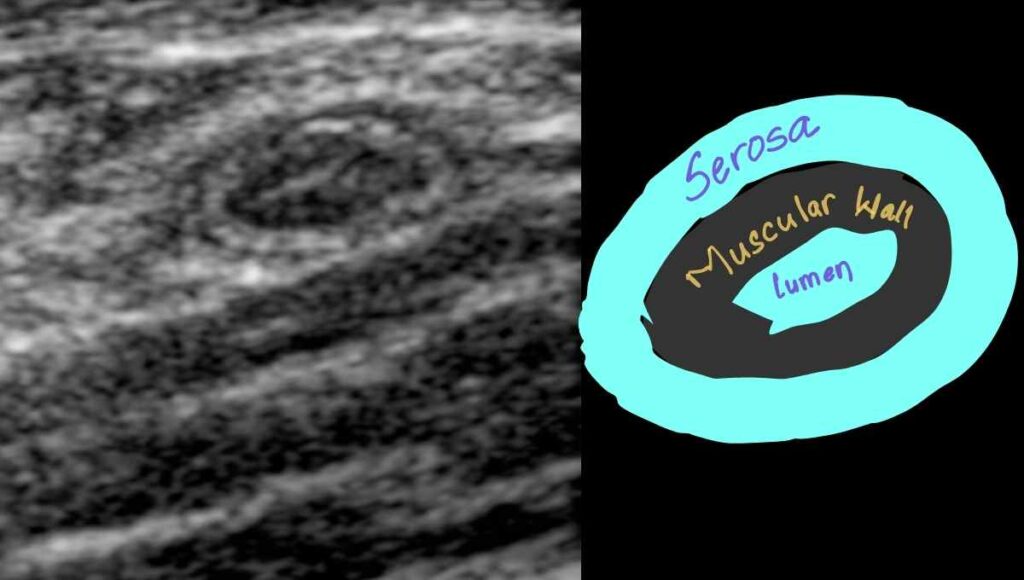
You will often see Three Layers of Appendix in Daily Practice
On a standard machine, you will most often see three distinct bands rather than five.
- An inner echogenic (bright white) layer — the collapsed lumen and mucosa touching each other — appears as a slit-like line at the center.
- A middle hypoechoic (dark) ring represents the muscular wall. Muscles have high water content, so sound waves pass through them easily, making them appear dark grey or black.
- An outer hyperechoic (bright white) rim represents the serosa and the surrounding connective tissue.
PracticalSono Tips:
In gangrenous appendicitis, these layers disappear entirely. The wall becomes fuzzy and uniform. In perforation, you will see a break in the continuity of the bright submucosal layer (Layer 3). Think of that bright submucosal layer as your “safety line.” As long as it is intact, the appendix has not perforated.
The Key Landmarks
Now you know what the appendix looks like. The next question is: where do you look?
The appendix does not sit in the same location in every person. Knowing its surrounding landmarks is how you reliably find it.
1. The Cecum
Origin of Appendix: Posteromedial wall of the cecum, approximately 2 to 3 centimeters below the ileocecal valve. (We don’t usually look for ileocecal valve while scanning for appendix.)

Your job is to find the cecum first, then trace downward to find the appendix.
On ultrasound, you identify cecum as wavy, bumpy pattern of echoes. This is due to haustration present in large bowel. These echoes are due to dirty shadows from gas and stool taking the shape of haustration.
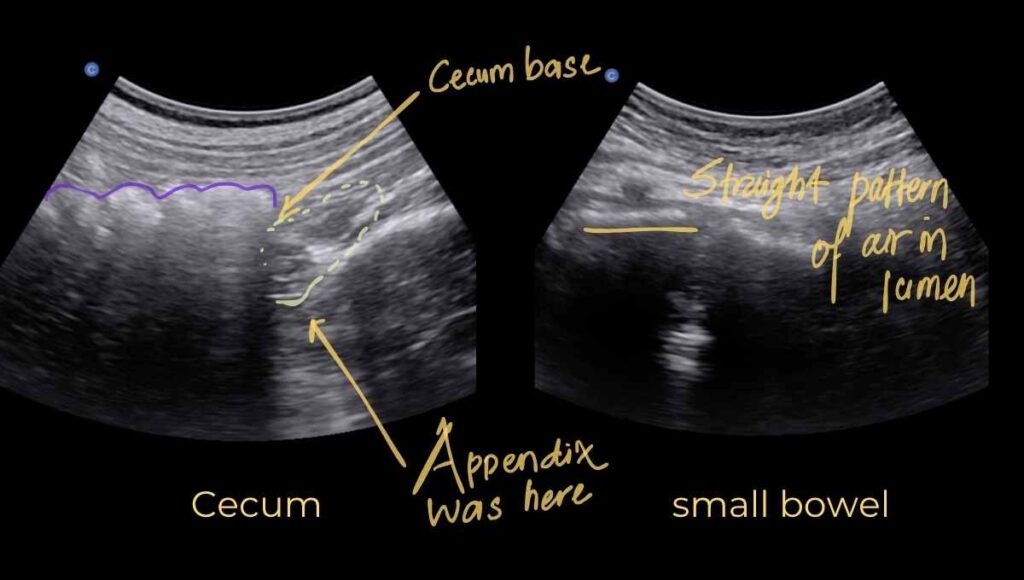
Once you recognize the cecum, slide the probe downward into the right iliac fossa. Keep sliding until wavy or bumpy pattern of echoes disappears.
This is the base or tip of the cecum.
Use graded compression, adjust the probe and look for a blind-ended tubular structure or a target sign. That is your appendix.
Remember: the appendix is usually medial to the cecum.
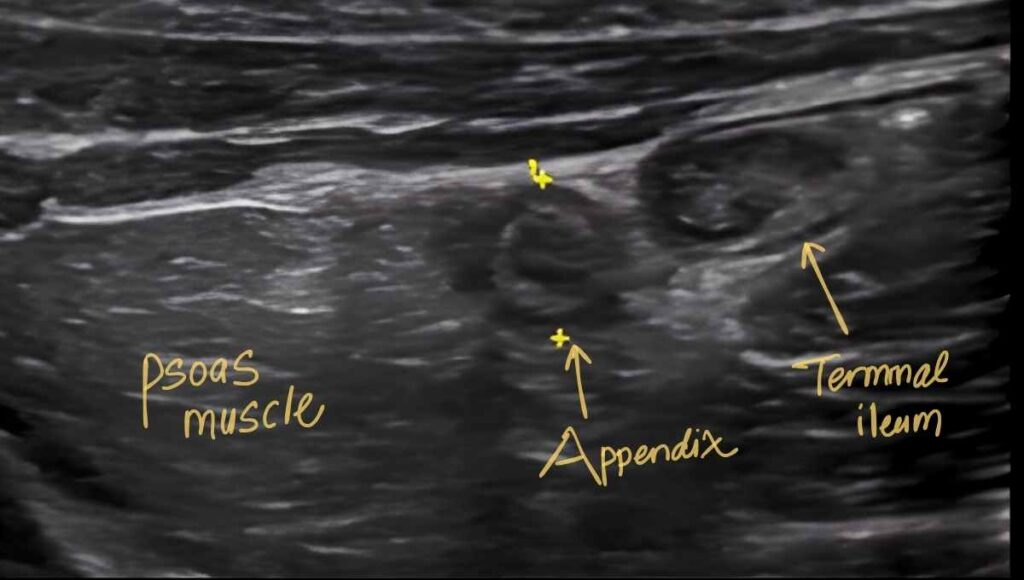
2. The Terminal Ileum
The appendix arises from the cecum approximately 10 to 20 mm inferior to where the terminal ileum meets the cecum.
The terminal ileum is smaller than the colon, compressible, and has no haustrations.
Unlike colon, it shows a smooth, straight pattern of air which appears as a straight hyperechoic line rather than the wavy bumpy line you see in the colon.
Common Mistake
The terminal ileum, when compressed, often looks exactly like the appendix. Here is how to tell the difference:
- Release your compression. The terminal ileum will expand back to its normal size and you will see peristalsis inside it. The appendix stays the same size and shows no peristalsis.
- In short axis, look for the flowery (florate) mucosal pattern in the small bowel, which is absent in the appendix.
This rule applies to all bowel segments. When in doubt, release pressure and watch for peristalsis.
PracticalSono Fact: Bowel segment in all area of abdomen when compressed appears as appendix (Target Sign).
3. The Iliopsoas Muscle
The iliopsoas muscle is the posterior floor of the right lower quadrant. It sits directly behind the cecum and appendix.
On ultrasound, it appears as a large, stable, dark (hypoechoic) structure with bright parallel streaks running through it which are the muscle fibers.
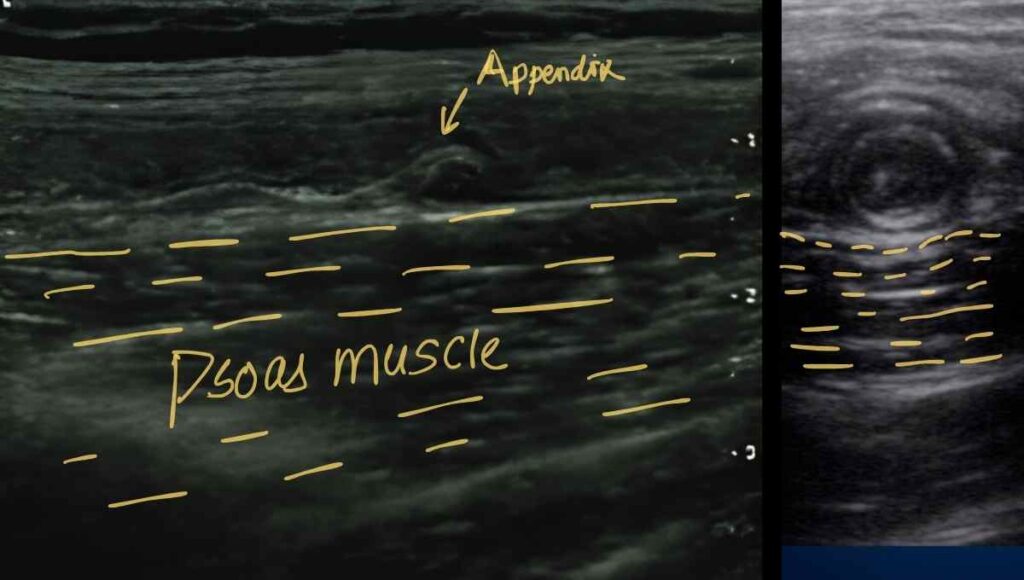
This muscle is fixed and non-compressible. Due to this reason, you can pin the appendix against it.
Trick here is to apply gradual compression in right lower quadrant. Bowel which are compressible will move away, while non-compressible (inflamed) appendix can be pinned against the muscle.
Appendix will appears as target sign sitting on top of those muscle fiber lines.
Next, look for the indentation or bowing of muscle fiber. This will tell you whether Appendix is compressible or not.
A normal appendix will flatten completely when compressed against this firm surface.
A non-compressible appendix will also create an indentation on the psoas muscle surface as you push.
4. The External Iliac Vessels
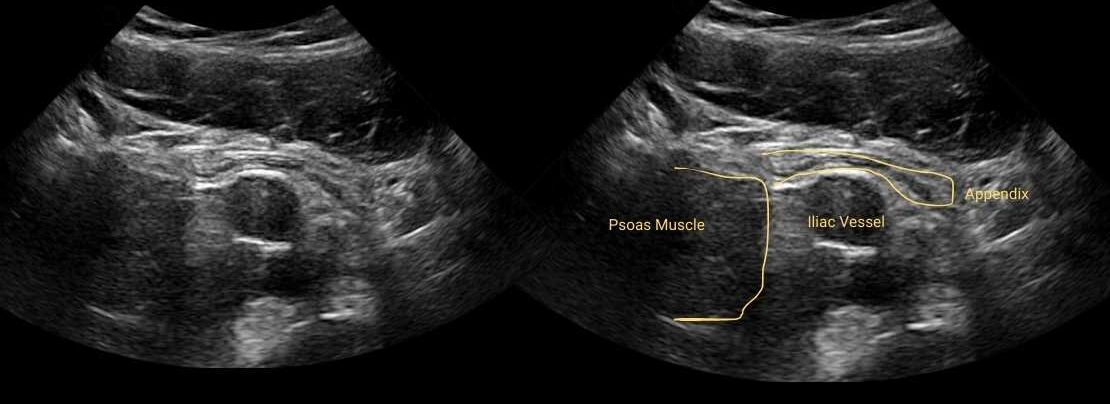
The external iliac artery and vein run along the inner border of the psoas muscle.
In short axis, they appear as two large, dark, round circles. The artery shows rhythmic pulsation, and the vein is compressible.
A normally positioned appendix (Pelvis, Pre-ileal) frequently drapes directly over or runs immediately anterior to these vessels.
When you find these structure, put gradual compression on your probe, you’ll see appendix draped on top of them like a snake.
PracticalSono Tips:
When you apply too much pressure at level of external iliac vessels in transverse section, anterior wall muscle touches psoas muscle. You’ll not see any bowel within it. Now, release the pressure slowly, bowel start to come into view. Here, you’ll see the appendix draped over the vessels. Also you can compress the posterior wall of right iliac fossa to make the bowel move downward and with it appendix also move.
The Sandwich View
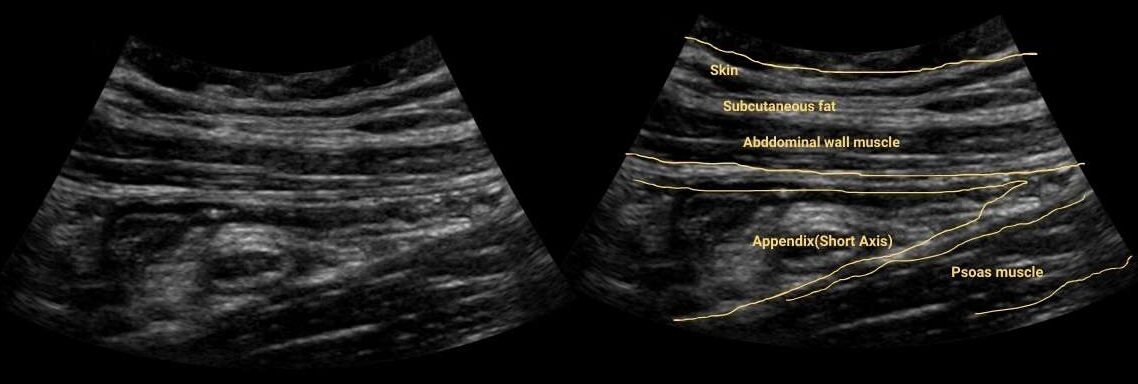
Here is a concept that changes everything for beginners: the appendix is not that deep. It sits within 1 to 2 cm beneath the skin surface.
It is sandwiched between the anterior abdominal wall muscles and the posterior psoas muscle.
The middle layer between them, where cecum, small intestine, and bowel gas tend to crowd the view, is what makes things difficult.
Your job is to compress through that middle layer using graded compression and pin the appendix against the posterior wall of abdomen (iliopsoas muscle).
Variation in Position of Appendix
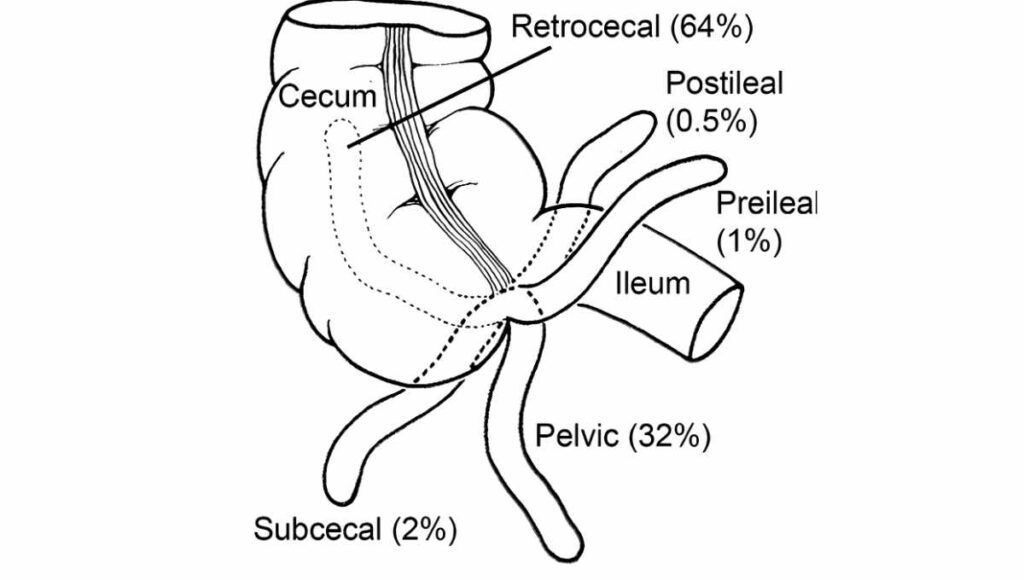
The appendix is notoriously mobile. While its base is always fixed to the cecum, the rest of the tube can point in almost any direction. You need to know the common positions before you scan.
Retrocecal Position (~65% of cases)
The most common position. The appendix bends backward and climbs upward, hiding behind the cecum.
This is the most difficult position to see on ultrasound because the gas inside the cecum blocks the ultrasound waves.
Pelvic Position (~30% of cases)
The appendix hangs straight down over the pelvic rim, pointing toward the bladder, rectum, or uterus and ovaries.
This position is actually easier to see on ultrasound. Look for the appendix draped over the iliac vessels and diving into the pelvis. In women, transvaginal ultrasound may be needed to visualize a deep pelvic appendix.
PraticalSono Tips:
If you cannot find the appendix from the standard anterior approach, always check the retrocecal region. (look behind the cecum from the right flank). This is the most common site of missed appendicitis.
Scanning Technique: How to Find the Appendix
Patient Preparation
In an emergency setting, there is no need for a full bladder. Keep the patient supine.
Consider giving analgesic before you start. Why? You will be applying graded compression, and this can be painful. A patient in severe pain will not cooperate, and cooperation is essential for a good scan.
Probe Selection
Start with a low-frequency curvilinear probe. Use it first to get a wide view of the right iliac fossa and look for free fluid, inflamed mesenteric fat, dilated bowel loops, or abscess. (features of complicated Appendicitis.)
This gives you the big picture and helps rule out perforation right away. The curvilinear probe is especially useful in obese patients and helps localize the cecum and terminal ileum.
Then switch to a high-frequency linear array probe. (12 MHz or higher) This is preferred probe for evaluating the appendix due to higher resolution.
With this probe, you can see the wall layers, measure the diameter accurately, and detect subtle signs of inflammation.
However, if the appendix is deeper than 3 cm and you may struggle to see it clearly, go back to the lower frequency probe.
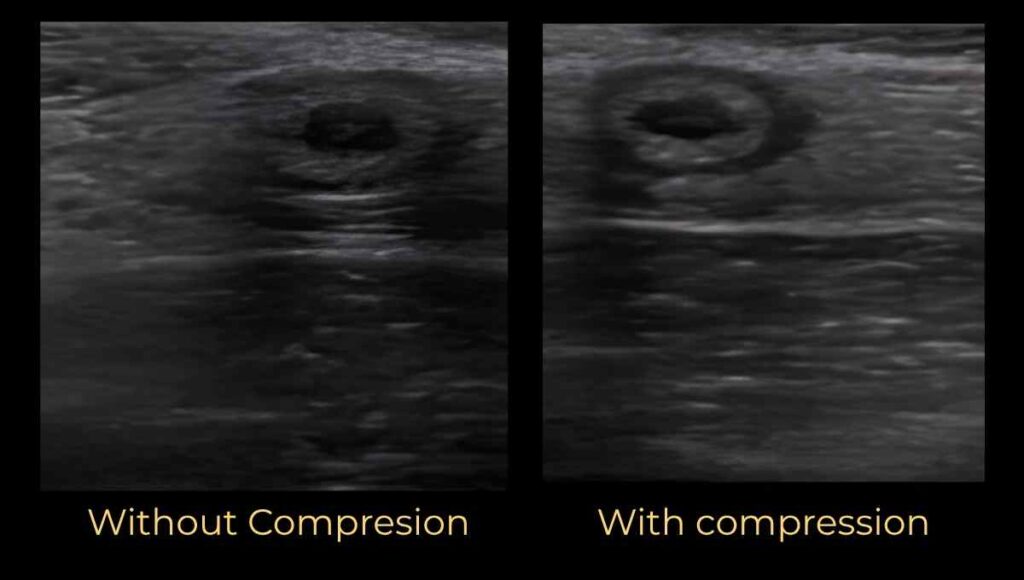
Graded Compression (Key to Finding Appendicitis)
Graded compression is the single most important technique for finding the appendix.
Without it, you are just pressing and hoping. With it, you systematically push away the gas-filled bowel loops that obstruct your view and reveal the appendix underneath.
Here is how to do it correctly: place the probe over the area and gradually add more and more pressure. Push slowly. Do not let the probe bounce back. By compressing slowly, you push overlying bowel out of the way without causing unnecessary pain.
While you compress, watch both the screen and your patient’s face. The most painful spot under compression is usually where the inflamed appendix lives.
PracticalSono Tips:
Watch your patient’s facial expression while applying graded compression. Wincing or guarding right as you press a specific spot is one of the best clues you have. An inflamed appendix is usually exactly where the patient hurts most.
Now, let’s talk about specific scanning technique for Appendicitis.
Before jumping into any systematic approach, start with the simplest technique.
Step 1: The “Where Does It Hurt?” Technique
Ask the patient: “Where does it hurt most? Can you point with one finger?” Scan right there. Apply gradual compression.
If you find the appendix, visualize its entire length, trace it back to its origin from the cecum, and confirm the blind-ended tip.
If you do not find the appendix where it hurts, move to the systematic approach.
Step 2: The Systematic Approach
Scan each area in sequence. If you do not find the appendix in one location, move to the next. Do not give up after one or two views.
#1 Scan at tip of the cecum
Appendix originate from the base of cecum. So, this is the place where we start our scan to find the appendix.
How?
- Start in the umbilical region in the transverse plane.
- Move the probe laterally. Look for the bumpy, wavy gas pattern of the cecum. Slide the probe all the way down until the cecum ends, that is its tip.
- Look in this area for a blind-ended tubular structure.
Remember: the transverse plane of the cecum is the long axis of the appendix. When you see the cecum in cross-section, you are positioned to see the appendix as a long tube. The reverse is also true. The longitudinal view of the cecum is the short axis of the appendix.
#2 Look for the appendix draped over the iliac vessels
If you cannot find the appendix from the cecal tip, look for it draped over the external iliac vessels.
Find the iliac vessels in short axis in right lower quadrant near the psoas muscle.
They appear as two dark, round, black circles. The artery pulsates; the vein compresses. This view is especially useful in thin women and children.
A normal or mildly inflamed appendix often looks like a tube crawling over these vessels. Pin the appendix against the vessel wall with compression. If it is normal, it will flatten.
#3 Look posterior to the terminal ileum
Still no appendix? Locate the terminal ileum. It lies medial to the cecum, is smaller, has smooth gas pattern, and shows peristalsis.
The appendix is often found deep to or just posterior to the terminal ileum. If you can find the ileocecal valve, you know you are looking at the terminal ileum. The appendix is just below it.
#4 Look anterior to the iliopsoas muscle
Still nothing? Look anterior to the iliacus muscle. The appendix is commonly found here in males and children.
Apply graded compression and look for the target sign sitting directly on top of those parallel muscle fibers.
#5 Look behind the cecum (Retrocecal approach)
Go back to the cecum. Look lateral, medial, and posterior to it.
The retrocecal appendix is the most common site of missed appendicitis.
To access it, place the patient in left lateral decubitus (turn them 45 degrees onto their left side). This causes gravity to pull the cecum and small bowel medially, opening a clear acoustic window behind the colon.
Then place your probe on the far right flank in a transverse or coronal plane and scan from the side. This completely bypasses the gas-filled front wall of the cecum.
#6 Look deep into the pelvis
If you still have not found it, look in the pelvis.
A pelvic appendix is common in women. In this setting, transvaginal ultrasound is often needed to see the appendix clearly.
Most often only inflamed appendix is in the pelvic area. Normal, appendix is not that frequently seen.
PracticalSono Tips:
To confidently rule out appendicitis on ultrasound, you must visualize the normal appendix. If you cannot find it after scanning all positions, your report should state: “The appendix has not been visualized; however, no secondary ultrasound features of appendicitis are seen.” This is honest, accurate, and clinically appropriate. The absence of visualization does not exclude appendicitis, a second-line imaging study (CT or MRI) may be required.
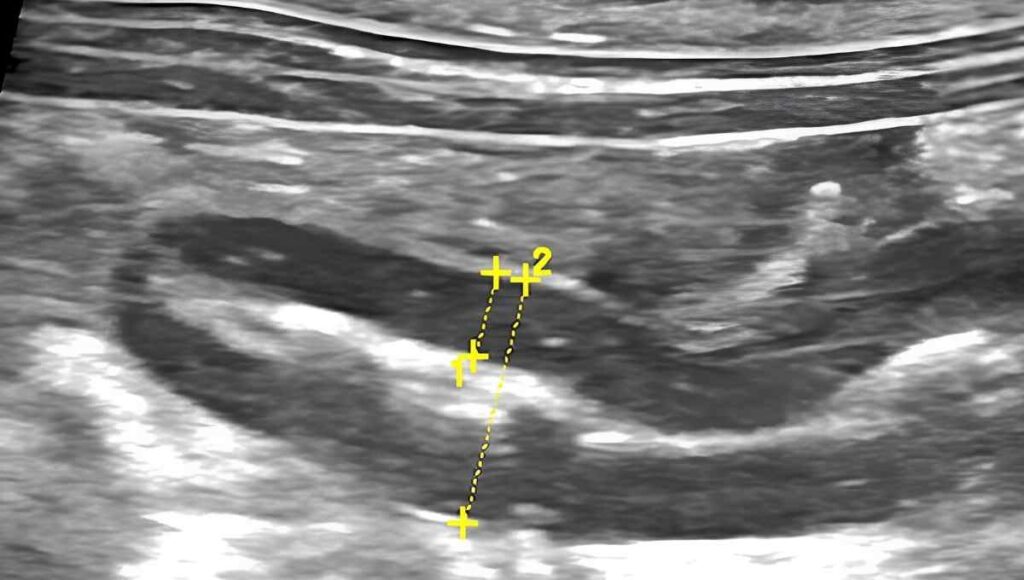
Standard Measurement Technique
Now that you have found the appendix, you need to measure it correctly. This is where many beginners go wrong and wrong measurements lead to wrong diagnoses.
Always measure the anterior-posterior (AP) diameter, not the transverse diameter.
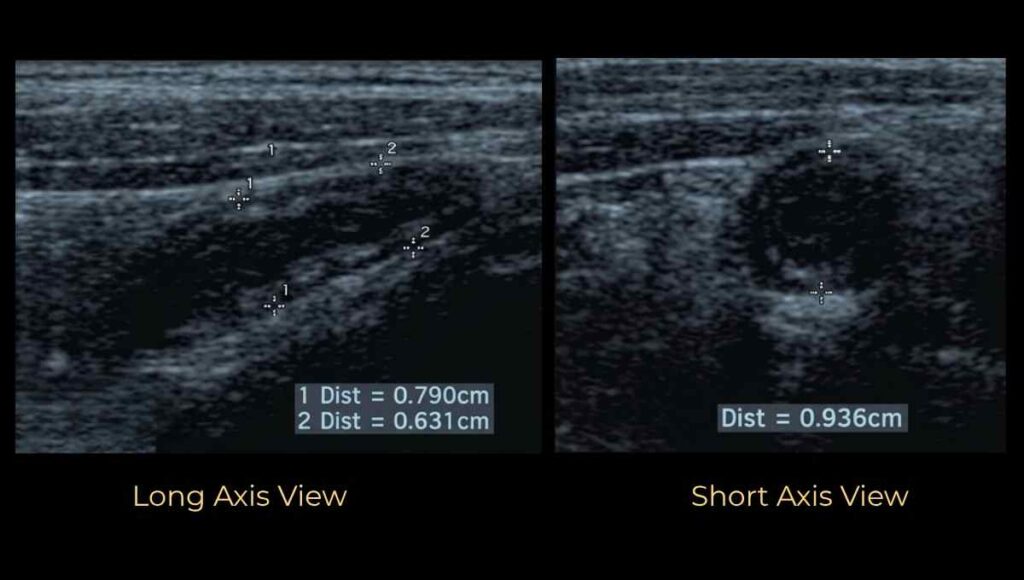
Place your calipers from outer wall to outer wall, from the outermost echogenic serosa on one side to the outermost echogenic serosa on the other side.
It is easier to measure the diameter of appendix in short axis target view (cross-section) than long axis view.
Why take AP diameter measurement? Why not transverse diameter?
When you compress the appendix, its transverse diameter increases while the AP diameter stays the same. (This is especially true for compressible, normal appendix)
If you measure the transverse diameter under compression, you will falsely inflate your measurement and may incorrectly diagnose appendicitis.
That’s why we always measure AP, not transverse diameter.
Measurement of wall thickness:
Wall thickness is measured from the outermost dark (hypoechoic) layer to the innermost dark layer.
Why measure wall thickness?
In appendicitis, inflammation and edema of wall increase its thickness, and ultimately increase the diameter of appendix.
However, appendicitis is not only reason for increase in diameter of appendix. Intraluminal content such as fluid and fecal material might increase the diameter without any sign of inflammation. In such case, the wall thickness remain normal.
PracticalSono (Pitfall Alert)
You see, appendix rarely increase in size beyond 2cm during inflammation. Appendix that size get easily perforated. That’s why you won’t see that large sized appendix.
Here comes important points:
If the structure you are measuring is more than 2 cm in diameter, it is probably not the appendix.
It might be bowel segment compressed that looks like appendix.
If you are measuring something very large, release compression and watch. You will likely see peristalsis, confirming it is bowel.
Classification of Ultrasound Findings
Once you have completed your scan, one of four scenarios will apply.
Either, you’ll not be able to visualize appendix or you’ll see normal appendix. Or, you may see features of acute appendicitis.
Acute Appendicitis can be without complication or with complication.
Complicated Appendicitis is with or without perforation.
Type X: Non-Visualized Appendix
You scanned all positions and could not find the appendix. This does not exclude appendicitis. Report secondary signs and recommend further imaging if clinically indicated.
Type 0: Normal Appendix
You found a normal appendix. 6 mm or less, partially compressible, no hyperemia, no secondary signs of inflammation. Appendicitis effectively excluded.
Type 1: Uncomplicated Appendicitis
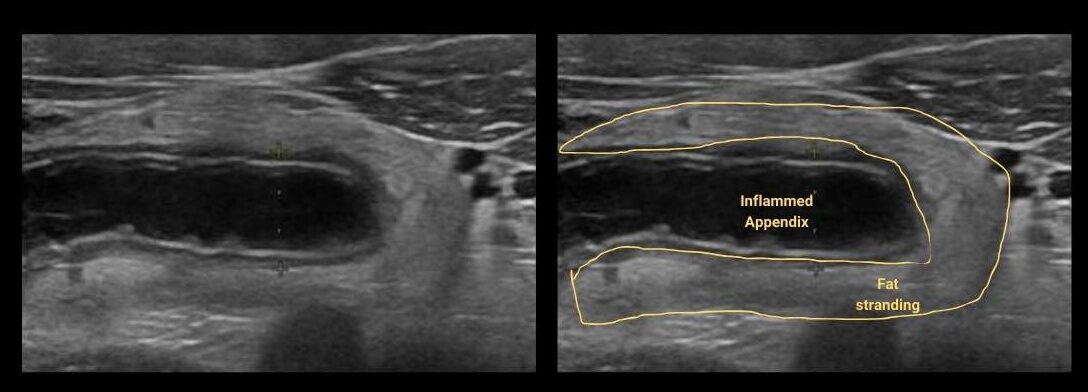
Non-compressible, enlarged appendix (≥6 mm) with wall thickening and periappendiceal fat stranding. No gangrene, no perforation.
Types 2 & 3: Complicated Appendicitis
Type 2: gangrenous appendicitis without perforation. Type 3: perforated appendicitis with abscess, phlegmon, or free gas. Surgical emergency.
Pathophysiology and Ultrasound Stages
Understanding what is happening inside the appendix at each stage tells you exactly what you will see on ultrasound. This is not just theory. Every pathological stage has a specific ultrasound features.
Stage 1 — Luminal Obstruction (The Trigger)
The primary cause of appendicitis is luminal obstruction.
This can be caused by fecaliths (hardened stool), lymphoid hyperplasia, foreign bodies, parasites, or tumors. Think of it as a physical blockage that starts the whole cascade.
Ultrasound Finding:
An appendicolith appears as a bright hyperechoic structure inside the lumen with a sharp posterior acoustic shadow behind it.
Stage 2 — Luminal Distension and Bacterial Growth
Mucus production continues behind the blockage but cannot escape. Pressure builds inside the appendix. It stretches and enlarges. Bacteria start multiplying in the trapped fluid.
Ultrasound Finding:
The AP diameter becomes more than 6 mm. The appendix looks like a blind-ending tube. Because it is under pressure, it does not compress when you press with the probe. (Normal appendix is partially compressible)
Stage 3 — Venous and Lymphatic Congestion Leading to Wall Edema
As pressure keeps rising, small veins and lymphatic vessels in the appendiceal wall collapse. Fluid leaks into the wall layers, causing edema.
Ultrasound Finding:
Wall thickness exceeds 3 mm. In the transverse view the appendix shows a target sign, a dark hypoechoic wall layer caused by fluid in the muscle.
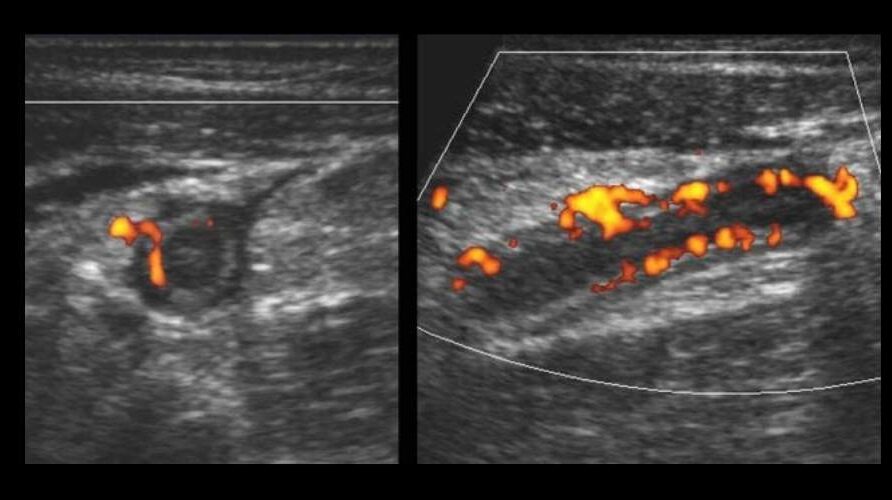
Stage 4 – Increased Blood Flow Within the Wall (Inflammation)
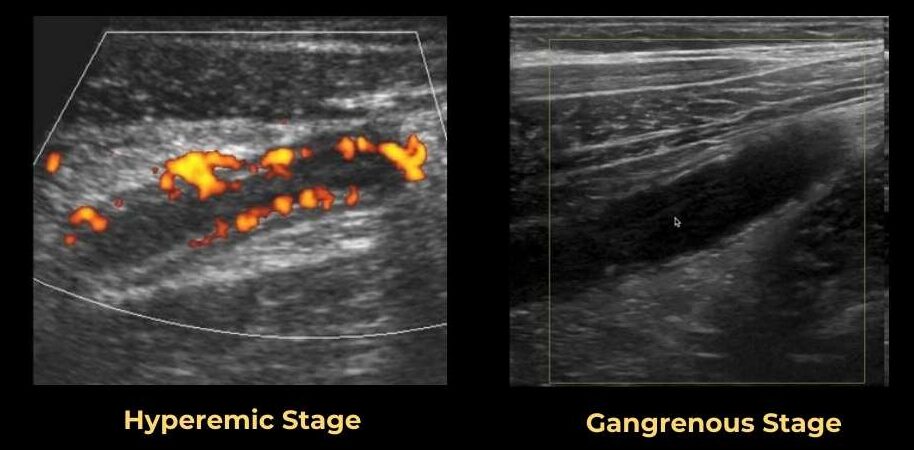
The body reacts by widening nearby arteries to bring white blood cells to fight the infection. This is called hyperemia.
Ultrasound Finding:
Color Doppler shows increased blood flow in the appendiceal wall.
Stage 5 — Periappendiceal Inflammation (Spreading)
Inflammation spreads through the appendiceal wall into the surrounding fat. Pus begins to form inside and around the appendix. The omentum, the “policeman of the abdomen”, moves toward the inflamed appendix, trying to wrap around it and contain the infection.
Ultrasound Finding:
Inflammation of mesenteric fat appears as grey or hyperechoic structure wrapped around appendix. It is often referred as thyroid in belly.
Stage 6 — Wall Ischemia and Gangrene
This is a critical and irreversible stage. The pressure inside the appendix now exceeds arterial blood supply. Blood can no longer reach the wall. The tissue begins to die. Gas-forming bacteria invade the appendiceal wall and worsen the damage. This is a true surgical emergency, rupture can occur within hours.
Ultrasound Finding:
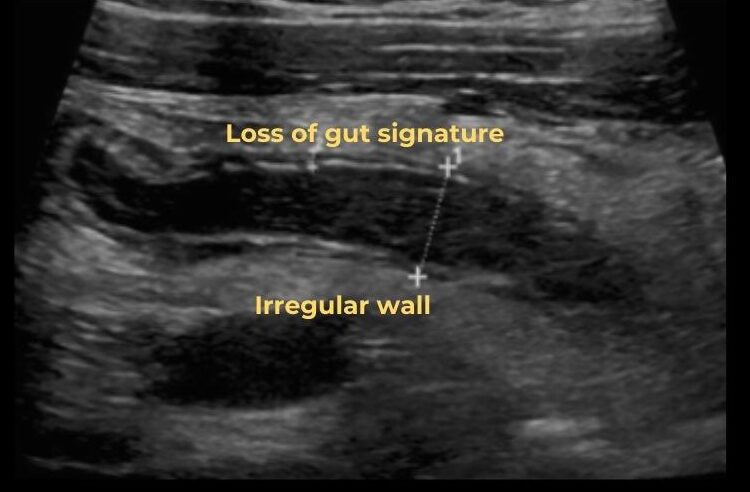
The most reliable sign of gangrene is loss of mural stratification (the normal wall layers disappear). The bright submucosal layer (the “safety line”) is no longer visible.
You may see air within wall of appendix. This is called Pneumatosis intestinalis. (Remember, air within lumen is normal finding)
Color Doppler shows no blood flow in the wall. It becomes avascular. A non-compressible appendix larger than 6 mm with no Doppler flow is a major warning sign.
Stage 7 — Perforation
The necrotic wall can no longer tolerate the rising pressure and finally tears open. This usually occurs within 24 to 48 hours after symptoms begin.
Infected material (pus, bacteria, and sometimes the appendicolith ) spills into the peritoneal cavity.
There may be a brief period of pain relief after rupture as pressure drops, but severe pain returns quickly as generalized peritonitis develops. Do not be fooled by this false improvement.
Ultrasound Finding:
The appendix often becomes difficult to identify after perforation as it decompresses and collapses. Look for a visible break in the bright submucosal layer.
At this, you need to look for secondary signs. Body tries to wall off the inflammation. You’ll see in inflamed mesentery, free fluid, abscess.
Fluid spill and reach the dependent part of peritoneal cavity. (Look for fluid in Pouch of Douglas and Morrison’s pouch.) You may see appendicolith outside the appendix in the surrounding fat. This is definitive proof of perforation.
Stage 8 — Abscess or Phlegmon Formation
The body’s last defense mechanism. Once the appendix ruptures, the omentum and nearby loops of small bowel move toward the rupture site, sticking to the area and forming a protective barrier.
This creates either a phlegmon (an unorganized solid inflammatory mass) or an abscess (a walled-off, liquid collection of pus) ,or both.
Ultrasound Finding (Phlegmon)
An ill-defined, hypoechoic, heterogeneous area in the right iliac fossa. No clear fluid center. Bright, hazy inflamed fat with thickened bowel loops that do not move.
The sliding sign is lost because structures are stuck together. Use the curvilinear probe to find it as it is deep in the right lower quadrant.
Ultrasound Finding (Abscess)
A complex fluid collection with low-level gray echoes from pus and debris. Internal septations may be visible. Gas-forming bacteria create bright white air foci with dirty acoustic shadowing.
Color Doppler shows no flow in the center (pus) but increased flow in the wall (immune response). Always check the right iliac fossa, the pouch of Douglas, and Morrison’s pouch as you may see spill of fluid in these areas.
Type 1: Uncomplicated Acute Appendicitis
Uncomplicated appendicitis means there is no gangrenous change and no perforation. The appendix is inflamed but structurally intact. Here is what to look for.
(Primary signs are changes seen within appendix and Secondary signs are changes in structure around the appendix due to spill of infected material from it in case of perforation.)
Primary Signs:
- Size and Compressibility
- AP diameter ≥ 6 mm (outer to outer); Diameter > 8 mm is highly specific for appendicitis
- Inflamed appendix is Non-compressible. It does not get flatten with probe pressure.
- Wall thickness > 3 mm (mucosa to serosa)
- Shape and Structure
- Blind-ended, non-peristaltic tubular structure
- Positive McBurney sign. It means when compress the inflamed appendix with probe, patient will experience pain
- Appendiceal wall layers still intact
- Increased Color Doppler flow in the wall
- May contain an appendicolith in the lumen
PracticalSono Tips:
Do not diagnose appendicitis by size alone. Normal appendices can measure up to 13 mm in width (in some cases) and still be normal. Always consider the full clinical picture: compressibility, wall thickness, Doppler flow, and secondary signs of inflammation together. A 7 mm appendix that is soft, compressible, and has no surrounding fat stranding is probably normal.
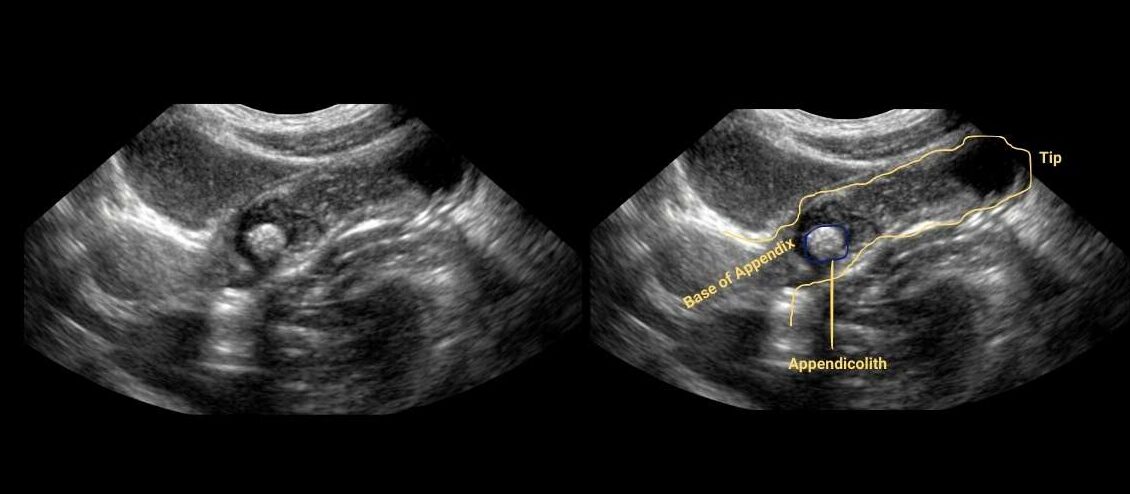
About the Appendicolith
An appendicolith is a calcified structure seen within the lumen of the appendix. It forms from aggregated fecal materials that calcify over time, usually made of calcium phosphate with some fecal and organic matter.
On ultrasound it appears as a bright echogenic structure inside the lumen with a sharp posterior acoustic shadow.
An appendicolith can be present in a perfectly normal appendix, it is found in 4% of asymptomatic patients.
However, in a patient with signs of appendicitis, an appendicolith changes the clinical picture significantly.
It usually warrants appendectomy because appendicoliths cause a high failure rate with non-operative management. The bacteria within the appendicolith form a persistent source of infection, and the stone can traverse the appendiceal wall, leading to perforation.
Secondary Signs of Inflammation:
These are periappendiceal findings that support the diagnosis. They are highly sensitive, nearly 98% specific when seen without the appendix being directly visualized.
However, they are not specific to the appendix alone.
Think of them this way: they tell you something is wrong in this area, but not necessarily that it is the appendix. (You may see these finding in other condition also like Tubo-Ovarian abscess, ruptured ectopic pregnancy)
Key Secondary Signs are:
- Inflamed hyperechoic mesenteric fat (fat stranding), the “thyroid in the belly” appearance
- Free fluid around the appendix or in the pelvis
- Thickened cecal wall (swollen, engorged large bowel adjacent to appendix)
- Local ileus. Due to response to inflammatory fluid coming out of appendix, small bowel loops get dilated with decreased peristalsis.
- Enlarged, round lymph nodes with feeding vessels
PracticalSono Tips:
Dilated bowel loop > 25 mm with echogenic fat and complex fluid. This combination has 99.5% specificity for perforated appendicitis.
Secondary Signs Without Appendix Visualization: Studies confirm that the presence of secondary signs alone — without directly seeing the appendix — is enough to suggest the diagnosis of acute appendicitis. If you see bright inflamed fat and free fluid in the right iliac fossa but cannot find the appendix, do not ignore these signs. Report them and recommend further imaging.
Uncomplicated Acute Appendicitis Ultrasound Features (Key findings)
- Primary Sign
- AP diameter : >6 mm ( >8mm definitive)
- Wall thickness: > 3mm
- Non-compressible
- Fecolith within lumen
- Color Doppler: increased vascularity (We don’t always find this. Need high-end ultrasound machine)
- Secondary sign
- Inflamed hyperechoic mesenteric fat
- Free fluid
Type 2 & 3: Complicated Appendicitis
Without Perforation (Type 2) : Gangrenous Appendicitis
Complicated appendicitis without perforation is a highly severe, advanced state where the appendix tissue has entered an irreversible stage of cell death, but the outer wall has not yet burst open.
There are two histological forms you need to know:
- Gangrenous non-perforated appendicitis:
- It involves ischemic tissue death affecting the full thickness of the appendix wall. The rising pressure inside the blocked appendix exceeds the pressure in the supplying blood vessels, causing microvascular thrombosis. Cut off from oxygen, the tissue begins to decay, turning the appendix structurally fragile and friable, extremely close to rupture.
- Severe phlegmonous appendicitis:
- It involves a massive bacterial invasion spreading through all five layers of the appendix wall. The appendix is severely engorged and surrounded by a dense mass of inflamed fat and adjacent intestinal loops. High volumes of purulent inflammatory fluid accumulate outside the wall, but no perforation hole has yet formed.
With Perforation (Type 3): Abscess Formation
When the wall finally bursts, trapped high-pressure fecal material, necrotic fluid, and virulent gas-producing bacteria spill directly into the sterile peritoneal cavity.
Direct Signs of Perforation:
- Discontinuous wall defect: In the long axis, the parallel wall lines suddenly terminate or show a visible gap at the perforation point
- The “deflated balloon” appearance: The appendix loses its stiff, rounded shape and collapses; it becomes paradoxically harder to see than when it was inflamed
- Extraluminal appendicolith: A calcified stone found outside the appendix in the surrounding fat is definitive proof of rupture
- Extraluminal gas: Bright white gas pockets in the surrounding fat with dirty acoustic shadowing
- Loss of the echogenic submucosal layer
- Absence of wall vascularity on Color Doppler
Secondary Signs of Perforation:
- Complex loculated free fluid in the right iliac fossa or pouch of Douglas
- Abscess formation: Complex fluid collection with pus and debris
- Phlegmon/ Inflammatory mass: Ill-defined solid inflammatory mass with no clear fluid center
- Dilated, fluid-filled bowel loops without peristalsis (ileus)
- Bright non-deforming fat with enlarged mesentery (Fat stranding)
- Increased hepatic periportal echogenicity (in severe cases)
Important Limitation:
Even with highly accurate CT and ultrasound, no safe differentiation between uncomplicated and complicated appendicitis can be made on imaging alone. Always combine imaging findings with clinical scores, WBC, and CRP to reach a correct diagnosis.
Abscess vs Phlegmon
| Feature | Abscess | Phlegmon |
|---|---|---|
| Physical State | Liquid collection of pus | Solid/semi-solid inflammatory mass |
| Boundaries | Walled-off with a distinct fibrous capsule | Uncontained with ill-defined, blending borders |
| Ultrasound Appearance | Dark fluid with bright pus debris; glowing outer rim; posterior acoustic enhancement | Messy, bright, distorted tissue; no fluid pocket; no posterior enhancement |
| Color Doppler | No flow in center; increased flow at wall | Increased flow throughout the inflamed mass |
| Key Difference | Walled-off, liquidized collection | Solid, spreading infection through tissue |
Resolving Appendicitis
Occasionally, appendicitis can resolve spontaneously, but only if there is no appendicolith blocking the lumen.
If a hard, calcified fecal stone is present, the blockage is permanent and the appendix will almost always eventually perforate.
Without an appendicolith, the obstruction may resolve on its own and the inflammation subsides. (Viral Infection)
You will recognize resolving appendicitis by a reversal of the inflammatory features on serial examination:
- the AP diameter shrinks back toward normal,
- the appendix becomes compressible again,
- wall thickness normalizes,
- Color Doppler hyperemia disappears,
- periappendiceal fat stranding regresses,
- and free fluid is reabsorbed.
Important Pearls
Always scan in two plane
Bowel when compressed can look exactly like the appendix target sign in the short axis. But rotate to long axis and you will see a long tubular loop with peristalsis. Always confirm in both longitudinal and transverse planes, and look for the blind-ended tube.
Visualize the entire length of the appendix — do not miss segmental appendicitis
This is critical. The appendix may be normal in its proximal portion but enlarged and inflamed at its tip. This is called tip appendicitis or segmental appendicitis. If you do not see the fundus (the blind end), the appendix should be reported as “non-visualized.”
How do you find the tip? Follow the target sign in the short axis view all the way to where it disappears — that is the fundus. Then rotate 90 degrees to get the long axis view and confirm.
Air-filled appendix: Is it normal?
In the short axis view, an air-filled appendix appears as a single bright echogenic line, one little flash of light. This is actually helpful. Air acts as a contrast agent and helps you identify the appendix. In a normal appendix, the air is inside the lumen. In gangrenous appendicitis, you may see air within the wall itself, not the lumen. Know the difference.
Appendix is serpiginous, NOT straight
A normal appendix curves and bends. It only straightens when it is inflamed or distended under pressure. This is why you will often see the short axis and long axis of the appendix in the same ultrasound plane, because it is serpiginous.
Non-compressible appendix bows the psoas muscle inward
When you compress a rigid, non-compressible appendix against the psoas muscle, the psoas muscle bows inward while the appendix stays round and does not flatten. If the structure does flattens easily and does not indent the muscle, it is likely normal or it is bowel.
Always start with a wide view using the curvilinear probe
Before going in with the high-frequency probe, get the big picture. The curvilinear probe gives you the whole right lower quadrant. You can see free fluid, dilated bowel, inflamed fat, and abscess at a glance. This tells you immediately how sick this abdomen is, before you even find the appendix.
If your patient is significantly obese, the high-frequency linear probe will not penetrate deep enough. Use a lower frequency probe. If the appendix still cannot be visualized, be honest in your report and recommend CT.
How to : Reporting Appendicitis (Sample)
Knowing how to report your findings is just as important as knowing how to find them. A well-structured report communicates your findings clearly and helps the clinical team make the right decision.
Here is a sample report for acute appendicitis with periappendiceal inflammation.
Findings:
A non-compressible, blind-ending tubular structure is seen in the right iliac fossa arising from the cecal base, measuring 8 mm in AP diameter (outer to outer) with wall thickening measuring 4 mm. The surrounding mesenteric fat is hyperechoic and poorly defined, consistent with periappendiceal fat stranding. A small echogenic focus with posterior acoustic shadowing is noted within the lumen, suggestive of an appendicolith. Minimal adjacent free fluid is present in the right iliac fossa. Color Doppler demonstrates increased vascularity within the appendiceal wall. The appendix was visualized in its entirety, including the fundus. No evidence of wall layer discontinuity or extraluminal gas.
Impression:
Sonographic features are consistent with acute uncomplicated appendicitis with periappendiceal inflammation and an appendicolith. No sonographic evidence of abscess or perforation at the time of examination. Surgical consultation recommended.
Differential Diagnosis
Right lower quadrant pain does not always mean appendicitis. You need to recognize these common mimics.
Ovarian Cyst
In female patients, always consider gynecologic causes of right-sided pain — hemorrhagic ovarian cysts, ovarian torsion, and ovarian masses. Hemorrhagic ovarian cysts cause lower abdominal pain, especially mid-cycle. They appear as complex cystic structures with internal echoes and a characteristic “cobweb” or reticular pattern.
Here’s the key rule: even after you find an ovarian cyst, you still need to show a normal appendix to confidently exclude appendicitis as a co-existing or alternative diagnosis.
Ectopic Pregnancy
In a pregnancy test–positive woman with right lower quadrant pain, always think ectopic pregnancy. In a ruptured ectopic pregnancy, you will see heterogeneous hyperechoic fluid in the pouch of Douglas and a gestational sac or adnexal mass. The uterine cavity will be empty. This is a surgical emergency. Do not mistake it for appendicitis.
Mesenteric Adenitis
Mesenteric adenitis is quite frequent in children and young adults. It is a viral infection that causes lymph nodes in the mesentery to enlarge. It resolves on its own without surgery.
On ultrasound, you will see borderline to mildly enlarged clustered mesenteric lymph nodes (short axis > 5 mm, three or more nodes).
The key is finding the normal appendix to rule out appendicitis.
Note: appendicitis itself can also cause lymph node enlargement, so finding lymph nodes alone does not confirm mesenteric adenitis.
Urolithiasis / Ureteric Stone
A ureteric stone can cause severe right-sided pain that mimics appendicitis. Look for hematuria on urinalysis — that is your clinical clue.
On ultrasound, look for a shadowing hyperechoic stone in the ureter and associated hydronephrosis in the right kidney.
Intussusception
Intussusception occurs when one segment of bowel telescopes into another, causing obstruction.
It is most common in young children aged 6 months to 3 years, often presenting with intermittent colicky pain, vomiting, and “currant jelly” stool.
On ultrasound, intussusception appears as a concentric ring sign or “target sign” in the long axis — a “pseudokidney” appearance.
Unlike appendicitis, this target is not a blind-ended tube; it is a longer bowel-within-bowel structure, compressible, and often shows preserved blood flow.
Location is also different. Intussusception typically occurs at the ileocecal region but forms a mobile mass that moves with compression. The appendix, by contrast, originates from the cecum at a fixed base.
Crohn’s Disease
Crohn’s disease can cause severe right lower quadrant pain and mimic appendicitis, especially when it affects the terminal ileum, which is directly adjacent to the appendix.
Most patients will know their diagnosis already, but in new presentations this can be difficult.
On ultrasound, Crohn’s affects the terminal ileum as a transmural process , all layers of the wall are involved, causing symmetrical circumferential wall thickening.
The bowel lumen is narrowed. The wall stratification may be preserved but the wall is markedly thickened (often > 4 mm).
The key differentiator is that the appendix itself is normal in Crohn’s disease. If you find a normal appendix alongside a thickened terminal ileum, think Crohn’s. CT or colonoscopy will confirm the diagnosis.
False Negatives — Reasons for Missing Appendicitis
Segmental / Tip Appendicitis
Proximal appendix appears normal; inflammation only at the distal tip. Always scan the entire length including the fundus. The tip is where appendicoliths hide.
Retrocecal Appendicitis
Cecal gas blocks anterior visualization. Use the left lateral decubitus position and scan from the right flank. Look for edematous fat behind the cecum.
Perforated Appendicitis
After perforation, the appendix decompresses and becomes very hard to see. Look for inflammatory mass or abscess instead.
Markedly Enlarged Appendix
An appendix approaching 1.5 to 2 cm may perforate soon or be mistaken for small bowel. Release compression and watch for peristalsis to confirm it is bowel. Confirm the distal blind-ended tip to confirm appendix.
Terminal Ileum Mistaken for Appendix
A compressed terminal ileum looks just like the appendix. Release compression: small bowel expands and reveals peristalsis. Appendix stays the same size. A still image of nearly any bowel can look like a target, always watch in real time.
False Positives — Over-Diagnosing Appendicitis
Resolving Appendicitis
Very uncommon, but the appendix can resolve spontaneously without an appendicolith. Serial examination shows normalizing features. Do not operate based on a single scan if the patient is improving clinically.
Dilated Fallopian Tube
A dilated fallopian tube (hydrosalpinx or pyosalpinx) can look like an inflamed appendix. Look for undulating mucosal folds inside it. It has no echogenic submucosal ring. Transvaginal ultrasound helps. Ongoing PID should be considered as a clinical diagnosis.
Psoas Muscle Fibers
Fibro-fatty tissue between psoas muscle fibers can look like an appendix in very thin patients. Key: always confirm in two planes. Anything that truly is the appendix should be visible as a tubular structure in both longitudinal and transverse planes. Psoas fibers will not be.
Peri-appendix changes from Surrounding Inflammation
External inflammation from Crohn’s disease, a tubo-ovarian abscess, or adjacent bowel pathology can cause serosal edema and wall thickening of a normal appendix. Once the underlying cause is treated, the appendix returns to normal. Know your patient’s clinical context.
Inspissated Stool Mimicking Appendicolith
Hardened stool in the ascending colon can cast an acoustic shadow just like an appendicolith. But it is within the ascending colon, not the appendix. Confirm location. An abdominal X-ray can help differentiate.
Mucocele of the Appendix
A mucocele is a dilated, mucus-filled appendix. It appears as a well-defined, anechoic or hypoechoic tubular structure, larger than a normal appendix. Look for the characteristic “onion skin” layering pattern inside. It can be mistaken for a complicated appendicitis.
Increased Diameter Due to Luminal Contents, Not Wall Edema
An appendix distended by stool or fluid in the lumen may appear enlarged but the wall thickness is normal. Appendicitis is a wall process. It is the wall that thickens, not the lumen that expands. Always measure wall thickness separately and look for secondary signs before diagnosing appendicitis.
Persistent Fetal Appendix
In this anatomic variant, the appendix has a larger diameter at its base and tapers distally. If you measure at the base, you may get a falsely high measurement. Always measure the mid-portion and confirm the taper distally before concluding the appendix is enlarged.
Key Takeaway
Finding the appendix on ultrasound is a skill that comes with practice, pattern recognition, and a systematic approach.
No one finds it perfectly on the first try.
What separates a confident sonographer from a frustrated beginner is knowing exactly where to look, what to expect at each step, and when to accept that the appendix is truly non-visualizable.
Follow the steps in this guide, trust your secondary signs, and never hesitate to recommend CT when the appendix cannot be seen. Your patient’s safety depends on that honesty.
Here is the thing: finding an abnormal, inflamed appendix is actually easy. It is big, stiff, and painful. It screams at you. The real challenge is finding a normal appendix because that is the only way you can truly rule out acute appendicitis.
You cannot say “the appendix is normal” if you have not actually seen it. That is the rule.